How to Keep Characters Consistent in AI Video (and Products, Too)
Six steps to keep the same character, and the same product, looking consistent across AI video scenes without regenerating the whole project.
Your first clip looks right. Then the next scene gives your character a different face, and your product shows up with a warped label. This guide shows you how to keep consistent characters in AI video, along with the products, locations, and brand look that need to carry from scene to scene.
Characters rarely drift because you picked the wrong model. They drift because the character only exists as a paragraph of text. You’ll get six steps, a fix-it table, and a checklist to run before you generate a full set.
Step 1: Lock What Must Stay the Same
Before you generate anything, write a short identity block. Cover age range, face shape, hair, skin tone, build, and wardrobe, plus one signature detail like glasses or a scar. For a product, note the shape, color, label, and anything that must never change.
Then split every shot description in two. Permanent traits are the identity, copied forward unchanged. This shot’s state covers expression, pose, action, and location, and it can change.
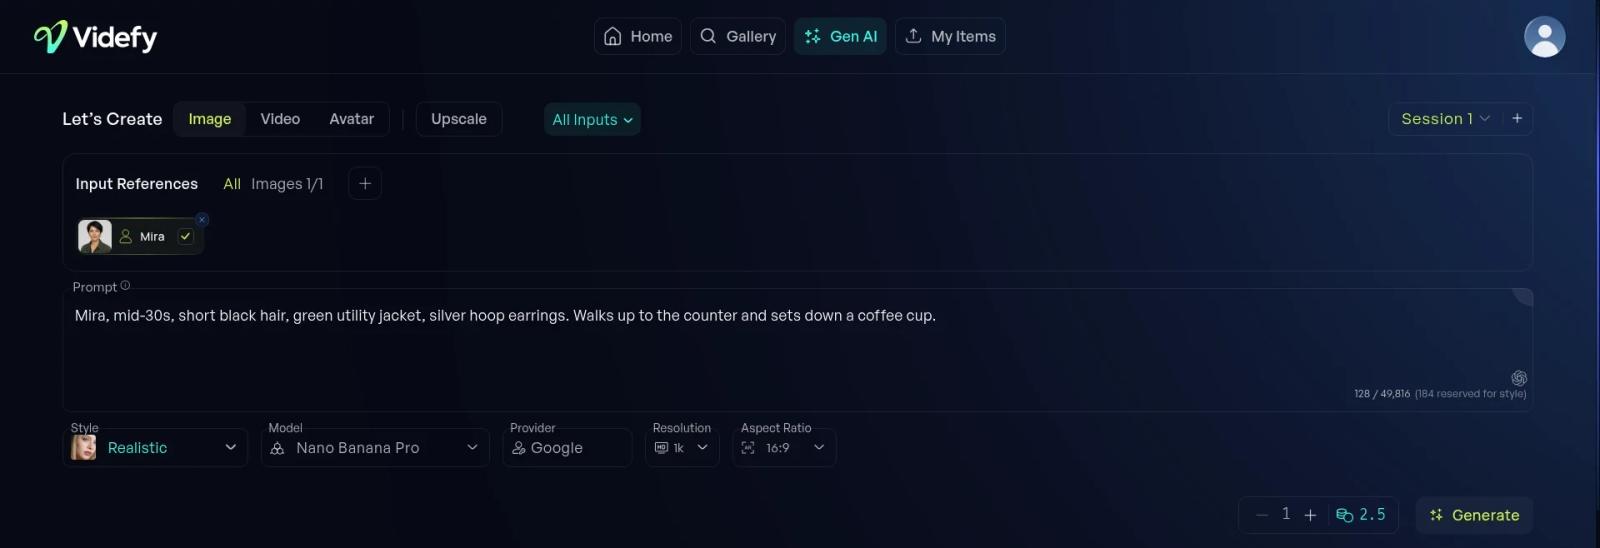
- Identity: “Mira, mid-30s, short black hair, green utility jacket, silver hoop earrings.”
- This shot: “Walks up to the counter and sets down a coffee cup.”
The identity line stays word for word in every prompt, which keeps the same character across scenes. If you’re still planning your shots, learn how to storyboard a video first.
Step 2: Build a Reference Pack
Text leaves too much to guesswork, so back it up with a few approved stills. For a character, start with a clear front-facing portrait: even light, plain background, eyes visible. Add a wardrobe frame if they appear full-body. For a product, use one clean hero shot plus a close detail of the label or logo.
In Videfy, these images become references. The reference picker includes Character, Location, Product, Brand kit, Color Palette, and Props. For a consistent product in AI video, use a clear product image and describe what should stay the same. That matters most in AI marketing videos.
To reuse files across projects, upload them to My Items. Uploading doesn’t attach a file to a generation, so you still add or select it in the tool’s input area.
Only upload photos of people who have given permission for them to be used in Videfy.
Step 3: Add References Before You Generate
References only help when they’re attached to the generation you’re running.
In Gen AI
- Open Gen AI from the top navigation or while editing a scene (on the Storyboard, use Extended Mode).
- Choose Image or Video.
- Choose the use case that matches the job, then add the required inputs.
- Open Add references, then choose Add references from the menu to browse the library, or Upload to add a file from your computer.
- Choose the relevant items, such as a Character or Product, confirm the selection, and check that they appear among the inputs.
- Write the prompt and review Style, Model, Provider, and the model’s settings. Check the quantity and credit cost, then choose Generate.
Tip: Once you add a Character or Product reference in a scene, it stays selected for that scene’s next generations. Before you choose Generate, check that it still appears among the inputs, especially after you switch models.
The number and type of references depend on the model. If you hit the limit, remove an input before adding another, and when you switch models, check that the new one supports your references. Click the Model control to open the Model Picker, then More details to see accepted inputs and the number of references. The picker can list models such as Seedance, Nano Banana, Nano Banana Pro, and Nano Banana 2 Lite. Treat them as options, not a ranking, and compare a few on the same brief.
Step 4: Prompt for the Shot, Not a New Face
Put your identity block at the top of every shot prompt. Under it, describe only this shot: the framing, one action, the setting, and how the shot should end. Don’t rewrite the hair, age, or outfit unless the story calls for it. Describe the face in new words, and you invite a new face.
For video, describe the movement too, and keep the first attempt to one action. “Mira turns toward the window” holds up better than “Mira turns, laughs, grabs her bag, and leaves.”
Use the same visual style across a sequence. In story creation, pick it in Choose Your Visual Style, or open a scene’s style control. None means no additional style instructions are added. A style doesn’t replace the scene description, so you still need to explain what happens.
For more practice, learn how to iterate on image prompts without wasting credits.
Step 5: Approve a Still, Then Add Motion
Catching drift in a still usually costs less than finding it in a video. So approve the face, wardrobe, or product in an image first, then animate it.
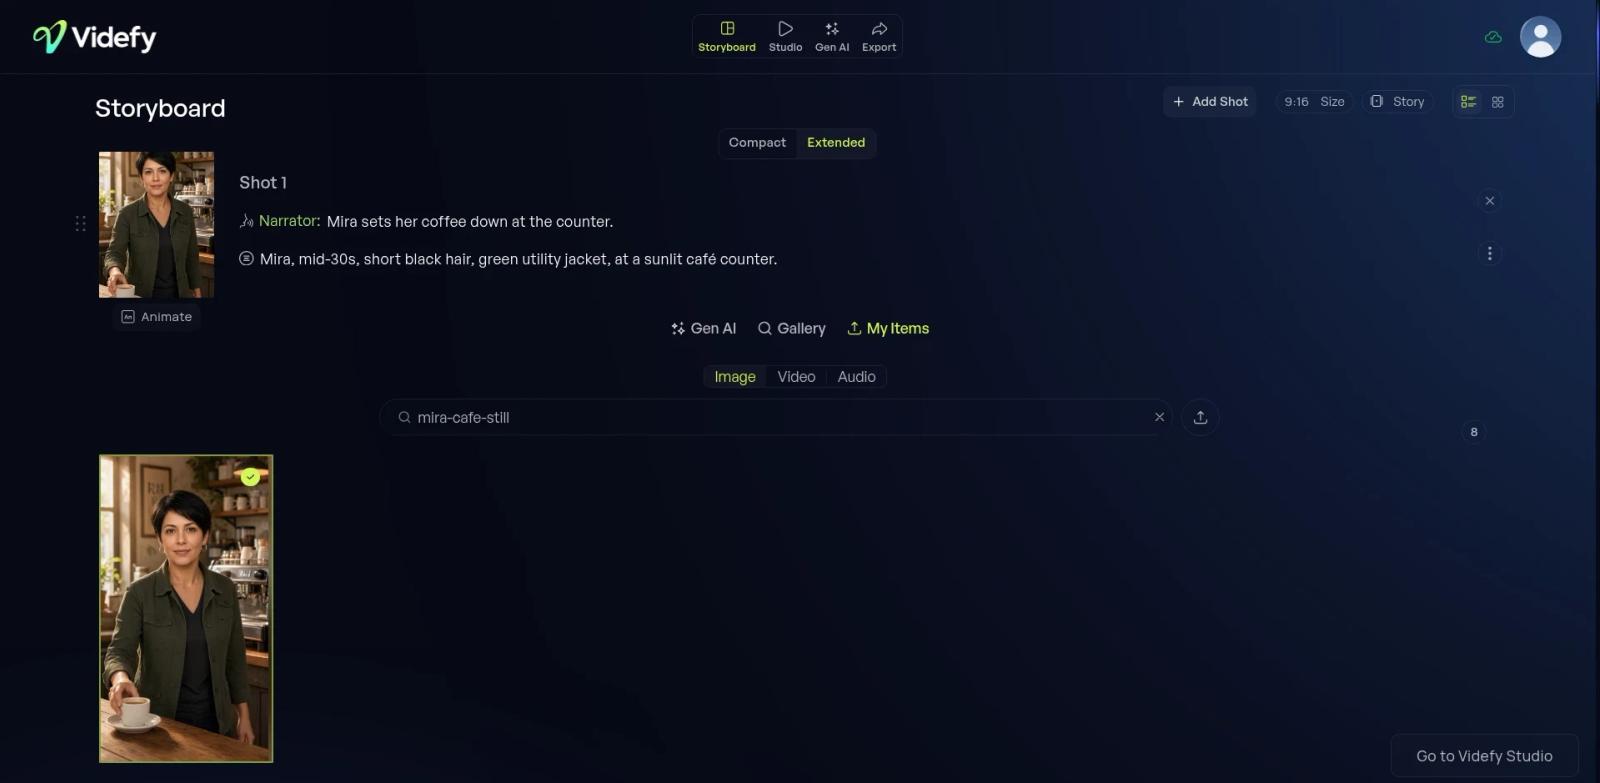
On the Storyboard, check the scene preview to confirm the still is the assigned visual. Then use Animate where available, and review the video model, duration, and credit cost before generating.
In Gen AI, you can also choose Video, pick the use case that matches the job, and add the approved still as an input if the model accepts one. Check accepted inputs in the Model Picker first, and make sure your Character or Product reference is still among the inputs.
Keep shots short and motion simple. If a take drifts, simplify the action or camera move and retry that shot, not the whole sequence. This works whether you turn a script into a video using AI or build scenes one by one.
Step 6: Review the Sequence and Fix Only What Drifted
Don’t judge clips in isolation. Play them in order on the Storyboard mini-player or the Videfy Studio timeline, and compare faces, wardrobe, and products at every cut. That’s where consistent characters in AI video are won or lost.
In Videfy, each scene has narration, a description, and an assigned visual. If you change the description, review the visual too. After a new result, check the scene preview to confirm the intended version is assigned.
Use this table to diagnose drift:
| What drifted | Likely cause | Fix |
|---|---|---|
| Face changes | No reference on that generation, or the prompt re-describes the face | Check the character reference is still in the inputs, then regenerate that shot |
| Outfit changes | Wardrobe isn’t in the reference pack | Add a full-body or wardrobe still |
| Product or logo warps | Weak product image | Use a clearer product reference and inspect packaging and text |
| Style shifts mid-sequence | The style changed or was set to None | Reuse the same style across the sequence |
| A good shot got worse | The whole sequence was regenerated | Regenerate only the scenes that drifted |
References guide the output; they don’t replace review. Check each scene before you generate a full set.
Before You Generate a Full Set: Quick Checklist
- The identity block is locked and copied into every prompt
- References are attached and visible among the inputs
- The same style is used across the sequence
- Each still is approved before you add motion
- Faces, wardrobe, and products match at the cuts
- Only the drifted shots get regenerated
Frequently Asked Questions
Why does my AI character look different in every scene?
Usually the character exists only as text, or the references weren’t attached to that generation. In Videfy, check that your Character or Product reference appears among the inputs before you generate. Keep them attached, reuse the identity block, and review the sequence.
How many reference images do I need?
Enough to cover the face and any wardrobe or product details that must stay the same. The number a model accepts varies, so check More details in the Model Picker.
Can I keep a product consistent too?
Yes. Use a Product reference, add a Brand kit or Color Palette when the look matters, and describe what must stay the same. Review logos, text, packaging, and colors closely before using the result.
Do references guarantee a perfect match?
No. They guide the model. You still check each scene and regenerate only the shots that drift.
Start Building Consistent Characters in AI Video
Consistency comes down to a locked identity, references attached every time, shot-focused prompts, and a review at the cuts. Open a project in Videfy, add a Character or Product reference to your scenes, and review the sequence before you generate the rest. Start free, no credit card needed.
For step-by-step detail, see how references work in the docs. Then add an AI voiceover for your video in the same project.