How to Add Subtitles to a Video (Auto, File, or Manual)
Three ways to add subtitles to any video, plus the timing and style rules that make them easy to read.
Your video is edited and ready to go. Plenty of people will watch it with the sound off, so the subtitles need to be right before you hit publish. Here’s how to add subtitles to a video in a way that works on any platform.
You’ll make one decision first: a subtitle file or burned-in subtitles. Then you’ll pick one of three methods: auto-generate from your audio, upload a file you already have, or write them from your script. Finally, you’ll fix the words and timing, style them so they’re easy to read, and run a quick check before you export.
Subtitle File or Burned-In? Decide Before You Start
There are two ways subtitles reach a viewer.
A subtitle file (SRT or VTT) holds the text and its timing separately from the video. Viewers can turn it on or off, and you can fix a typo without exporting the video again.
Burned-in subtitles are drawn into the picture itself. They’re always visible, which helps in muted feeds, but changing a single word means exporting again.
| Where it's going | What to use | Why |
|---|---|---|
| YouTube long-form or a website player | Subtitle file (you can also burn in a styled version) | Viewers control them, and you can edit without re-exporting |
| Short-form feeds and social posts where you can't attach a file | Burned-in subtitles | They show up even when the post is muted and no file is supported |
| Client delivery | Whatever the brief asks for | Deliver the requested format and keep the editable text for revisions |
Keep one approved version of the words and make every output from it. That way a correction only happens once. For how the formats fit into a wider workflow, see our guide to subtitles in post-production.
Method 1: Auto-Generate Subtitles From Your Audio
This is the fastest route for most videos, especially talking-head clips, interviews, and anything with clear narration. The tool transcribes the speech, splits it into lines, and times each line to the audio. Your job is to correct what it got wrong, which is usually quicker than typing every line from scratch.
One limit to know: auto-generated subtitles transcribe spoken words. They don’t describe music or sound effects. If your audience needs those cues, add them yourself during the editing pass.
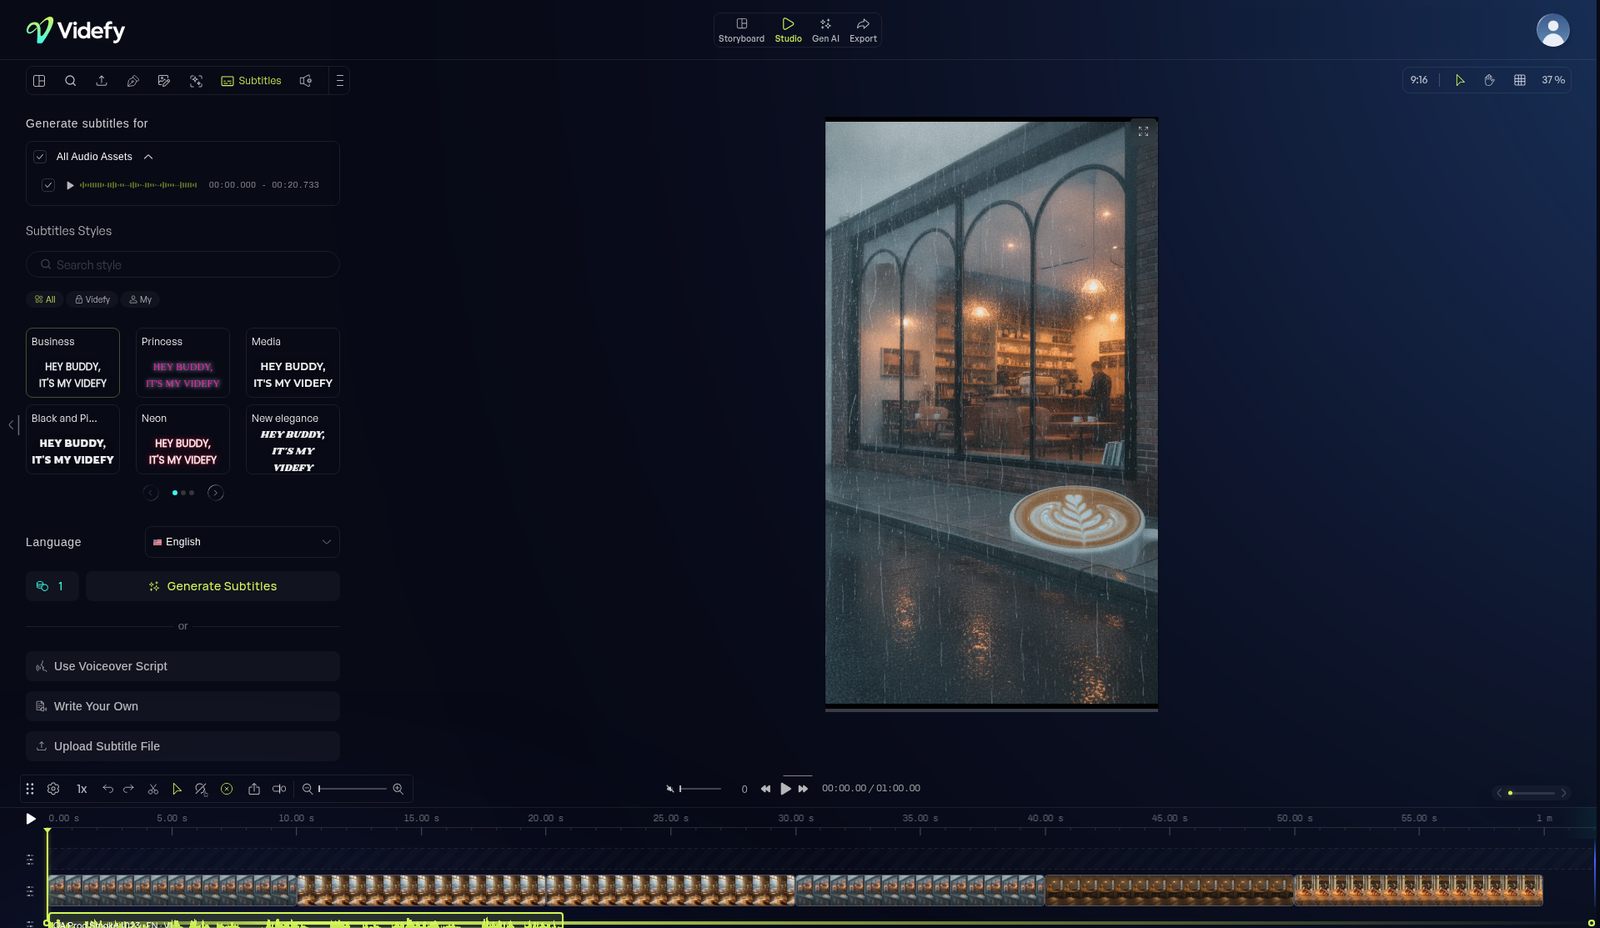
How to do it in Videfy
- Open your project in Videfy Studio and click Subtitles.
- Under Generate subtitles for, choose the source (for example All Audio Assets), then select the audio you want to transcribe.
- Pick a subtitle style from the presets.
- Choose the Language for the subtitles.
- Review the credit cost shown, then click Generate Subtitles.
Videfy times the generated subtitles to your video, and you can adjust the style afterward.
If you see No audio on timeline, add your audio or a video clip with sound first, or switch to a text-based method below. Clear audio gives you a cleaner first draft, so reduce background noise before you generate.
Method 2: Upload an SRT or VTT File
Use this method when you already have a transcript from a transcription service, a client, or another tool.
Timed formats like SRT and VTT carry both the text and the timing, so each line lands where it should. A plain-text file has no timing, so every line still has to be timed to the video.
In Videfy, go to Subtitles and choose Upload Subtitle File. Check the upload control for the supported formats and requirements before you import.
One rule matters more than any other here: make sure the file matches the final cut. If the edit changed after the file was made, even by a few seconds, the timing will drift and lines will appear early or late.
Method 3: Use Your Voiceover Script or Type Them Yourself
If your video started as a script, you already have the words. In Videfy, choose Use Voiceover Script to build subtitles from the narration script in your project. It’s a natural next step if you make your video from a script.
Choose Write Your Own for short videos, on-screen quotes, or any time you want exact wording that doesn’t follow the audio word for word.
Either way, typed subtitles still need a timing check. Play each section on the timeline and make sure every line appears with the speech it belongs to.
Fix the Words and the Timing
Start with an editing pass on the text. Check names, brand and product terms, numbers, and punctuation. Those are the spots where automatic transcription usually slips.
In Videfy, select a subtitle in the Subtitles panel, on the timeline, or on the canvas. Correct the text, then play the surrounding section to hear it in context. Use the timeline to change when it appears and disappears, and use merge to combine entries that flash by too quickly.
For readability, Netflix’s English (USA) Timed Text Style Guide and its General Requirements are a useful professional benchmark. They aren’t law, but they give you real numbers:
- Up to 42 characters per line, with a maximum of two lines. Use one line when it fits.
- A reading speed of up to 20 characters per second for adult programs.
- Each subtitle on screen for between 5/6 of a second and 7 seconds.
- Break lines after punctuation or before conjunctions and prepositions, and don’t split a first and last name across lines.
Style Subtitles So People Can Actually Read Them
Contrast comes first. On busy or bright footage, add a background or shadow behind the text, then check both light and dark frames so no line disappears.
Placement comes next. In vertical video, platform buttons and overlays cover parts of the frame, so keep your text inside the TikTok safe zones. For reframing and layout in 9:16, our guide to vertical video production goes deeper.
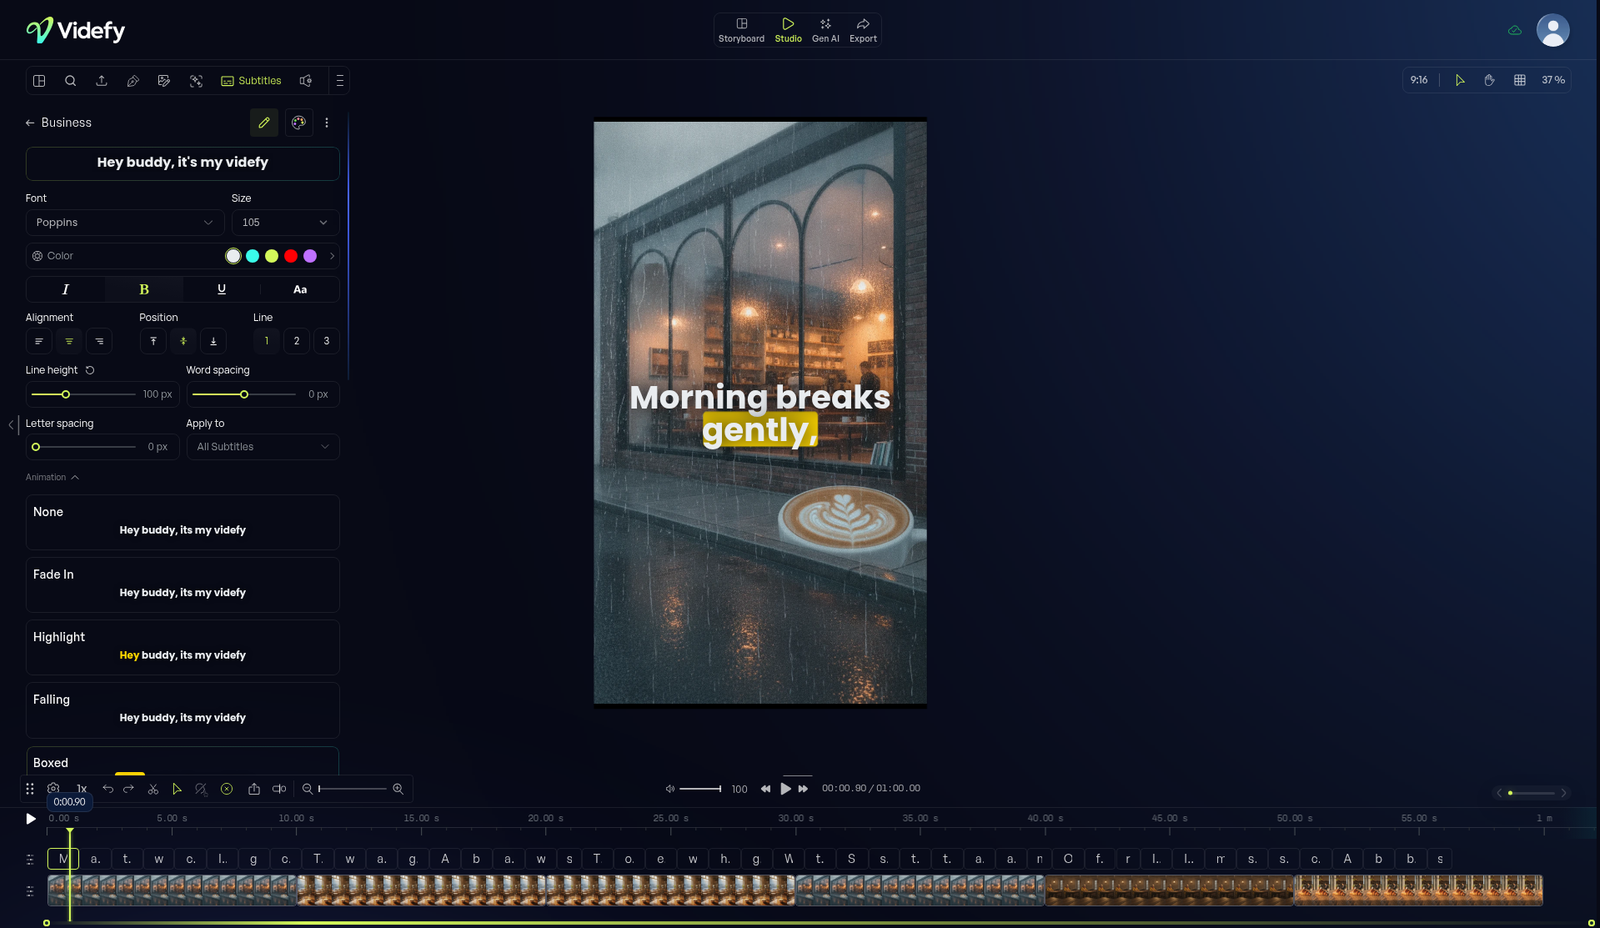
In Videfy, open the subtitle options menu and choose Edit Style. Pick a preset or adjust the font (typeface, size, and color), background and shadow, alignment and lines, capitalization, and spacing (line height, letter spacing, and word spacing). Click Save when you’re happy with it. Your saved styles live in My Styles.
Keep one style per channel or brand so every video looks consistent.
Translate Subtitles for Another Language
Translated subtitles let the same video reach a new audience without a new edit.
In Videfy, set the Language when you generate subtitles (use translation into another language when that option appears for your project). If you want to go further, Videfy can also translate voiceovers and turn one video into many versions for different languages from the same scenes.
Whatever tool you use, read the translated lines in context before you publish. Translations often run longer than the original, so recheck line length against the limits above and make sure every line still fits inside the frame.
Review Before You Export
Play the whole video once more and check:
- Accuracy: names, punctuation, and transcription errors.
- Timing: lines match the speech and stay up long enough to read.
- Readability: each subtitle is short enough to read comfortably.
- Contrast and placement: text is clear on light and dark frames and clear of the platform interface.
- Translation: translated lines read well and fit the frame.
When you export with subtitles visible, Videfy burns them into the finished video. Need a version without them? Use Hide Subtitles. They stay in your project but don’t appear in the preview or the exported video. Show Subtitles brings them back. For the rest of your export settings, see our editing tutorial.
After you export, watch the downloaded file on a phone and confirm that the subtitles you want are visible.
Frequently Asked Questions
Do auto-generated subtitles include sound effects?
No. Auto-generated subtitles transcribe speech only. If your viewers need descriptions of music or sound effects, add those lines yourself during the editing pass.
Should I burn in subtitles or upload a subtitle file?
Upload a subtitle file where the platform accepts one and viewer control matters. Burn them in when they must always be visible, such as in muted social feeds where you can’t attach a file.
Can I upload my own subtitle file to YouTube?
Yes. In YouTube Studio, the Subtitles section lets you upload a file with or without timing, auto-sync a transcript, or type subtitles manually. See YouTube’s subtitle help for the steps.
Can I remove subtitles without deleting them?
Yes. In Videfy, use Hide Subtitles. They stay in your project but are left out of the preview and the exported video. Choose Show Subtitles to bring them back.
Start Adding Subtitles
That’s how to add subtitles to a video: decide the delivery type, pick a method, then fix, style, and check.
Ready to try it? Open a project in Videfy, add subtitles from your audio or script, and style them in the same timeline you edit in. Start free, no credit card needed. See the step-by-step subtitles guide in the docs.